Sunday 19 July 2015

The Balcony of Eden Finally is Taking Form

This is kind of what I had in mind all along, three years ago when I started this project.
.
.
It's starting to get lush and filled in, and I just LOVE sitting in between my plants and watching them grow.
.
.
My apartment is only 527sf, and the balcony is only 70sf, but it truly has become the most spectacular space in my home. People usually say "wow!" when they see it.
.
.
Of course, I could still expand it much further - and I hope to - but it is starting to take the form and atmosphere that I was looking for. I'm happy I started this project.
.

Sunday 14 June 2015

Another Pathetic Carrot Harvest

.
They looked real pretty as they grew... but this is all they produced!
.
That there is a whopping 15oz of Grade A carrots!
.
Again, I think I didn't allow for enough spacing in between.

D'oh!

Sunday 31 May 2015

Longterm Garden Planning

.
.
The more that I look at the Balcony Garden, the more I think that rather than merely going for "production" in both quantity and monetary value (lol, which hasn't worked too well), the way to make the garden the most valuable to myself would be for it to produce me with my own salads a few times a week, for around six months of the year. I have only four large rubber-maid containers out there at the moment, but I'm pretty sure I could add another three if I turned them lengthwise. 
.
Left: Carrots, Strawberries, Zucchini & Cucumber / Right: Tomatoes & Nasturtiums
.
In the back corner, I could keep things pretty much as they are now, filled with tomatoes, zucchini, cucumbers and carrots. They all grow fairly well together, and also easily add to a fresh salad... but if I tried to grow potatoes back there again, like I did last year, they would interfere with eachother too much (Potatoes & Cucumbers are not Companion Plants). Plus, unless you are making potato salad, it's not a very "salad-like" vegetable - not too mention the problem of having to rotate your containers for the next three years, to ensure that more root-vegetables don't grow in it again before the soil replenishes. Too many root-vegetables out there, and you'll end up damaging your crops with scab and other such things after a few years... which makes root-vegetables very unnattractive to me, considering the other things I could grow instead which are arguably of higher value.
.
Left: Peppers, Nasturtiums & Tomato / Right: Kale, Radish, Watermelon & Salad Greens
.
Up front, I could have another container where the peppers are, and another in between the two already up there, if they were turned length-wise. Then I could start off the season with three full pots of kale and find a few other things to grow during the hottest months, and in the end of the year, plant ALL the big pots full of kale. That would make for quite a bit of kale - although, I think from now on, the only kale I'm going to grow will be the Red Russian variety. It only takes 45 to 60 days to grow, while most other varieties take around 80 to 90 days. That extra month, at both ends of the year, is quite a significant amount of growing time.
.
15oz Kale Harvested from One Pot
.
Plus, last year I produced 20oz of Kale out of only one pot, but this year I've pulled out only 15oz, although, as you can see, I still have another full pot to harvest. But, with proper planning and Red Russian Kale's significantly shorter growth period, perhaps three crops of kale could be pulled out a year, rather than two. Imagine if I could grow four pots in the spring, then perhaps another seven pots in the fall time - that would be a heck of a lot of kale, making quite a bit of salads and stamp-pot.
.
Left: Sprouting Salad Greens
.
If I expanded the garden with three more rubber-maid containers, I'd have to find another place for all the pots on the floor. Of course, I still have the railing to hang containers off of, but between the cost of the containers and especially the hangers ($40+ per container, plus $15 to $20 for the container... plus soil = $60/container), it is just cost-prohibitive to put six or seven containers on the railing - at least compared to the value I got from the rubber-maid containers, which grow far more crops but only cost about $18/19 each to set up, including the soil! When I look at that glass partition on the balcony, I think it would be much cheaper to rig up something alongside it that could hold containers - heck, I could even build a shelf myself, and I'm sure it would be a lot cheaper than spending several hundred dollars just to hang containers off the railing. It sure would be nice though, to have several containers, perhaps planted 2 weeks apart, continually sprouting with enough salad greens to have a fresh salad three or four times a week.
.
Here's how I think a season of crops could work (RM = Rubber Maid Container, PB = Planter Box):

RM #1 (Front) = Peppers x 8plants, Beans, Kale (Fall)
RM #2 (Front) = Kale (Spring), Beans, Cantaloupe (Summer), Kale (Fall)
RM #3 (Front) = Kale (Spring), Beans, Watermelon (Summer), Kale (Fall) 
RM #4 (Front) = Kale (Spring), Beans, Brocolli (Summer), Kale (Fall)
RM #5 (Side) = Kale (Spring), Cucumbers, Califlower, Pumpkin(?) or Kale (Late Fall?)
RM #6 (Side) = Radishes, Cucumbers, Carrots (Spring), Carrots (Summer), Kale (Fall)
RM #7 (Side) = Radishes, Cucumbers, Zucchini, Kale (Fall)

Front Corner Pot #1 = Tomato & Nasturtiums
Front Corner Pot #2 = Tomato & Nasturtiums
Back Corner Pot #3 = Tomato & Nasturtiums
Back Corner Pot #4 = Tomato & Nasturtiums

PB #1 (Railing - Side/Inside) = Salad Greens, Mustard Greens (Fall)
PB #2 (Railing - Front/Inside) = Salad Greens, Mustard Greens (Fall)
PB #3 (Railing - Front/Inside) = Salad Greens, Mustard Greens (Fall)
PB #4 (Railing - Front/Inside) = Salad Greens, Mustard Greens (Fall)
PB #5 (Railing - Side/Outside) = Strawberries
PB #6 (Railing - Front/Outside) = Strawberries
PB #7 (Railing - Front/Outside) = Strawberries
PB #8 (Railing - Front/Outside) = Strawberries
PB #9 (Place on Floor)= Salad Greens, Mustard Greens (Fall)
Hanging Pot & Various Small Pots on BBQ & Floor = Parsely, Mint, Dill, Chives, Garlic, Echinacea (Fall)
.
That would total as follows:
1 x RM Harvest of 8-10 Pepper Plants 
10 x RM Harvests of Kale
1 x RM Harvest of Cantaloupe
1 x RM Harvest of Watermelon
1 x RM Harvest of Brocolli
1 x RM Harvest of Cauliflower
2 x RM Harvests of Carrots
1 x RM Harvest of Zucchini (2 Plants?)
+/- 12 to 16 Pole Bean Plants
+/- 9 to 12 Cucumber Plants
+ 4 x Tomatoes & Nasturtiums
+ 5 x PB's of Salad Greens Rotating All-Season
+ Radishes Planted where/when Space Available All-Season
+ Strawberries & Herbs Producing All-Season
.
If I could get the little balcony ripping like that, it would not only look extremely cool but it ought to produce easily enough for me to be eating good, healthy garden salads on a regular basis throughout most of the year.

Thursday 14 May 2015

First Salads from the Garden

.
.
The lettuce and kale have been growing gangbusters out on the balcony - especially the kale. Kale has definitely proven to be the most easy thing to grow so far. In fact, as I was sitting out there pondering on the magnificence of my green thumb, I started speculating that perhaps what I should do next year is turn those two containers length-wise, and buy a third one to stuff in between. That way, I could plant a new container each month - starting in March, April and May - and since it takes around three months to mature, every month I'd have a full pot of kale to pick leaves from for salads or to make a couple of pots of stamp-pot. Since kale is such an excellent cool-weather plant, I suspect I could almost get three crops a year - with a pot maturing each month.
.
Kale (Left) and Lettuce (Left and Right)
.
The same as the lettuce - it would be ideal to get a couple more containers growing, and space their planting so that there is always some ready to harvest throughout the growing season. The pot of lettuce on the bottom left is a pretty small container and I've already harvested two salads from it, but I only planted one row in it - although I could have easily planted two rows. In the other container of lettuce - on the right - I planted three rows, and I suspect they will do just fine. I'm a little leary about growing lettuce out on that deck during the hottest months of the summer, though. There's really not a lot of shade out there and it gets pretty darn hot. Well, I'll try to keep these two pots going alternately throughout the summer to see and if they do okay, I'll work out a better system next year. This fall I'd also like to plant some mustard greens, since they are also a cool weather plant like kale, and can easily grow well into the fall. In fact, there are few things I'd like to try and grow this fall and winter - kale of course - but also some other cool weather plants I've been researching a bit, like echinacea and garlic.
.
.
The tomato I didn't grow myself, it was already in the fridge - but do you see those radishes there? Heh, okay, my radish harvest is still pretty pathetic - only about one ounce, but it's better than last years! (How could it not be?). I suspect the problem this year was that one night of frost back in April. After that, the plant leaves never really grew much more, although the radishes beneath developed a bit more - but still not to a satisfactory size for most of them.
.
Another Pathetic Radish Harvest!
.
I think in the future, I'm no longer going to dedicate a full container to radishes. I planted a few more a week or so ago in a bare patch in my carrot container. There's only 6 or 7 plants in there, but they grow fast and don't really take up too much space. I suspect that a person could easily grow radishes all year long simply by stuffing a couple of them in between the other plants here and there - like in your tomato containers, there's plenty of room once they get going to hold a few radishes beneath them. 
.
The Raspberry plant is perking up! (Left) - Carrots, Cucumbers, Strawberries and soon, Zucchini (Right)
.
Six of the cucumbers I planted along the edges of the two pots have come up as well, plus the two I still had inside when the frost killed my transplants back in April. Hopefully, with eight plants, I can fill in that screen mesh behind the containers with a good crop of cucumbers. I also planted two zucchini seeds in the far right container. I don't know if two is too many, but we'll find out. I think a big zucchini plant in the back corner of the balcony would look really lush and cool. The tomato containers as well have been supplemented by planting a few nasturtiums in each one - I seen just today that the first few have popped up through the dirt.
.
Peppers (Left) and Tomatoes (Right)
.
Although I mentioned possibly expanding the kale operation next year, that is not going to be the plan for this year. I've been trying to figure out something that I can grow in those two pots once the kale comes out in a couple of weeks, and I'd like to plant something that grows well in full sun and high heat - so that kind of removed things like broccoli and caulifower, which are cool weather plants. Instead, I decided to try something really "summery:" watermelon and cantaloupe. I think I could only grow one watermelon plant in a container, since the package says they are supposed to be planted five feet apart, lol. The cantaloupe I hope can grow with three or four in a container. I don't know, maybe this will turn into a flop - but I'll find out by the end of the summer. Also, as you can see, I bought some Miracle Grow plant food. Last year I didn't use any fertilizer at all except for compost, but last year I also didn't have too great of a harvest to brag about. Hopefully, this fertilizer does as advertized and significantly increases the garden's production.
.

Thursday 30 April 2015

Dandelion Wine

Wild Foods to Forage For
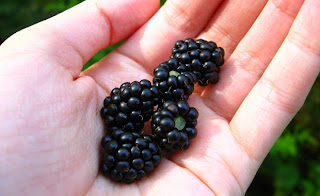
This year, I'm going to expand the Balcony of Eden's output potential by including local foods I can easily forage for. Blackberries grow like the bloody dickens here and, in fact, are pretty much considered pests as plants. I love eating them though! Over the past few years, I've usually spent a couple of mornings picking wild blackberries and then freezing them, to be used as a snack for later in the year... well, that's the plan, but I've usually run through my supply of blackberries by the end of September already. When I hunt around the house for something to eat in the evening, there really is nothing better than a ziploc bag of frozen blackberries - they take about a half hour to eat in their frozen state, taste great as they melt in your mouth, and are certainly healthier than potato chips or popcorn. Well, that's my opinion anyway.

http://masculineprinciple.blogspot.ca/2015/03/a-guide-to-birdwatching.html
Click Pic for Trail Peak's Description of Tea Pot Hill
So, this year, I would like to spend a bit of attention on foraging for wild food that lives in the Fraser Valley. For example, a few years ago, I hiked up to the top of Tea Pot Hill near Chilliwack, and discovered that along the trail were numerous amounts of fiddleheads, which of course, are edible and even considered somewhat of a delicacy. I don't know what they taste like, but perhaps I should give them a whirl, eh? (That's a project for later in the summer).

Be Sure Your Dandelions Have Not Been Sprayed with Chemicals!!!
In the meantime, since it is still April, what IS in season right now are dandelions. Yes, the mighty weed that is the bane of lawn manicurists everywhere.

However, I've been doing some research on eating dandelions, and have read that if you soak them in butter and fry them, they taste much like mushrooms. Hmmm. But also, of course, you can make Dandelion Wine.

So, today I visited my almost 80 year old mother and said, "You remember all those times I picked you dandelions when I was a young boy? How about for a change, we go for a drive in the countryside and you help me pick dandelions?" And... that's what we did, although, her back got sore after picking one bucket. But, she got an "outing" for the day anyway.

When she asked why we were picking dandelions, I told her I wanted to try to make wine with it - and then she told me a story about when her friend Evelyn used to make such wine, and she remembered it being "very potent." Lol! Cool! I've never tried it before.

So, that's what this post is going to be about - although - you'll have to be a bit patient, since the wine takes between six months to a year to complete. But, you've got to start somewhere, and for today, this blog post is it! I found a simple recipe on WikiHow for making dandelion wine - without all the fancy gear - and decided I'd try it out.
.
.
The first step(s) I did today. First, picking the dandelions, then washing them and now, they are being left to soak in water for the next two days.
.
.
Let's keep our fingers crossed and see how this experiment works out!
.
-----------------------------------------------------------------------------------------------------------------------------
.
Saturday, May 2, 2015
.
Okay, so after washing the dandelions and letting them soak for two days, it's time to start making some wine. Here are the directions and ingredients I am using to make my first batch:
.
1 Package Yeast (8g)
8 Cups of Whole Dandelion Flowers
(Approximately One Ice Cream Pail - The less green left on them will make the wine sweeter)
4 Litres of Water
1 Cup (250ml) of Orange Juice
6 Tablespoons (90g) of Lemon Juice
1/2 Teaspoon (1.25g) of Powdered Ginger
6 Cups (1200g) of Sugar
.
In a large pot, add together the Dandelion Blossoms, Water, Orange Juice and Lemon Juice, then stir in the Ginger and Sugar. Bring the mixture to a boil for an hour. This infuses the ingredients together into what will become wine after fermentation. My recipe here is pretty simple, but there are many other ingredients that can be added to experiment with different flavourings. Eg. Lime Juice, Lemon Peels, Orange Peels, Raisins, Dates, Figs, Apricots and Rhubarb. (I actually added an orange peel to this as it was cooking - I only had one orange left in the fridge, lol).
.
.
Strain the mixture, using coffee filters to keep any large particles from passing through, then let everything cool off for a while. Stir in the Yeast when the mixture is still warm, but below 100 degrees F. Then cover it and let it stand overnight.
.
.
-----------------------------------------------------------------------------------------------------------------------------
.
Sunday, May 3, 2015
.
Alrighty, my greedy little alcoholic readers, it's time for the great pouring of the wine! As you can see, I've got a pretty tiny little funnel, so I scooped it out with my coffee carafe first to make pouring it a little easier.
.
.
After you've got the wine in the bottles, take a balloon and prick a few holes in it, then stretch it out over the neck of your bottles. This creates and airlock and keeps out unwanted wild yeasts. After this is done, stick it into a dark closet for at least three weeks so it can ferment, then rack the wine a few times and cork it. (Racking means pouring the liquid from one bottle into another, leaving the sediment at the bottom so it gets further removed from the wine). After this, the longer you leave it before drinking it, the better. Six months is good, a year is even better.

The wine might take longer than three weeks to ferment if your storage area is cool, but also note that if you store it in temperatures higher than room temperature, it can change the taste of the wine and cause higher fusel levels - which are the cause of hang-overs (Also, the wine might turn rancid and be unpleasant to drink - not that such a thing would matter to my Lysol and Vanilla swilling readership, eh?). Fermentation temperatures should be between 10 to 24 degrees Celsius (50 to 75 degrees Farenheit).

Hey! Guess what? That's all there is to it! It takes a few days to complete, but it's really not all that much work. Altogether I spent about two hours of time - including driving around to find and pick the dandelions - and I still have two ice cream pails of dandelions left over to make a couple more batches with. Money wise, I'd say this batch cost me $4 to $5, and if after racking it a few times, I'm left with 3.5 litres, that would be a pretty good return, since buying 3.5 litres of wine at the liquor store would cost around $30 to $35.

Later in the summer, I'll see about making some Blackberry Wine as well. 
.
-----------------------------------------------------------------------------------------------------------------------------
.
Saturday, May 30, 2015
.
Alrighty, it's been about four weeks now since I made the Dandelion Wine... let's pull it out of the closet and see how it looks!

You can see the sediment that's built up over the past weeks, which is what we're going to try and get rid of by "racking," which is basically just pouring the wine into different containers while leaving the sediment at the bottom - and indeed, a good deal of sediment did build up. As was recommended in the original recipe, it might have to be racked several times over the next months.
.
.
It sure smelled like wine while I was pouring it - hopefully it tastes like wine this fall when I'll be drinking it! I've already been contemplating a Yuckaflux wing-dinger on my birthday in September, when my watermelon and cantaloupe should be ready as well.
.
.
I've been thinking that if this works out okay, maybe next year I'll see about making homemade wine in larger quantities... like perhaps 26liters of Dandelion Wine in the Spring and 26liters of Blackberry Wine in the Fall (a batch a weekend). That would make a litre of wine a week for the following year, and around $500 in market value... and the liquor store with its exhorbitant government taxes can kiss my sweet ass.
.
Hmmm... I wonder if tobacco would grow on the balcony, lol!
.
(I took a small sip, and it didn't seem to taste too bad... in fact, it was quite good - sweet, though). 
.
-----------------------------------------------------------------------------------------------------------------------------
.
Related Resource Links:
16 Ways to Eat Dandelions
10 Foods You Can Grow To Make Alcohol.
.

Wednesday 22 April 2015

A Garden on the Grow!

.
.
We've had some nice weather lately - in the low twenties celsius - and it really helped to give the garden a kick in the pants. Below is the still very dead blueberry bush, which will soon be pulled and replaced with a tomato plant, but the raspberry bush looks like it's struggling to make a comeback!
.
Dead Blueberry Bush (Left) and Struggling Raspberries (Right)
.
The strawberries have started to flower, and the radishes are plugging along, although I thought they'd be bigger by now. Perhaps I planted them too early... I hope I don't get a repeat of the Great Radish Famine of 2014!
.
Strawberries (Left) and Radishes (Right)
.
I planted a few of the pepper seedlings I had growing on the window sill, and as you can see, the kale is filling into those two pots nicely. In a week or two, I should start some more seedlings so I have something ready to go into those containers once the kale comes out.
.
Peppers (Left) and Kale (Right)
.
The carrots have come up well - and early. I left much more space between them this year, so hopefully they grow larger than they did last year. The two tomato plants seem to have survived the one night of exposure to the frost in the beginning of the month - it looks like they'll make it. 
.
Carrots (Left) and Tomatoes (Right)
.
The five cucumber seedlings, however, didn't make it. They struggled for a couple of days after the frost and then gave up the ghost. I had two seedlings still left inside, which I transplanted, and for the rest, I just planted some more seeds directly into the soil in the pots. I put a wire mesh behind the containers and planted close to the edge of the container. Hopefully I can get ten cucumber plants growing up there in total and get a good crop of them while still leaving most of the pot open to grow other vegetables.
.
Cucumbers & Mesh
.
Well, that's all for now. See you next time!
.

Tuesday 7 April 2015

Aaargh! Frosted Seedlings!

.
So, my five of my cucumber seedling and two of my tomatoes have been growing quite well in my little pots on the window sill since I planted them back in the end of February...
.
Tomatoes sprouted up!
.
I'd been watching them every day... watering them... talking to them... loving them...
.
Tomatoes (Left) and Cucumbers (Right) growing bigger
.
And the weather had been so nice over the past few weeks... it must have been a month since the last frost, so I started bringing them outside to harden them up before transplanting.
.
Tomato Seedlings (Left) and Cucumber Seedlings (Right) Hardening on the Balcony
.
Strawberries
And finally, after a few days of hardening, I proudly planted my little darlings, excited to get such an early jump on the growing season... until the next morning when I went out to my car - AND HAD TO SCRAPE FROST OFF THE WINDOWS!!!

Aaargh!
.
Oh well, what can you do?

The strawberries have perked up and the radishes and kale have poked up nicely, so I guess that's the silver lining to this cloud.
.
Radishes (Left) and Kale (Right)
.
... But I don't think I'm going to get much from these raspberry and blueberry bushes I bought last year. Gesh! $60 between the two of them, I didn't get more than a few berries to eat of off them, and they're toast by the next year.
.
Dead Blueberries (Left) and Condition Critical Raspberries (Right)
.
Those things were such a waste of time, effort and money, I think I might just take them completely off the "garden cost list" and write them off as a mistake of nature. KISS (Keep It Simple, Stupid!)
.

Tuesday 3 March 2015

Getting Rid of Pigeons on the Balcony

Well, there goes the neighbourhood. With the warming weather, the pigeons which demolished my bean crop last summer have returned to the building.
.
.
The little buggers made a nest above one of the neighbour's units, and there were oodles of these irritating birds all over the building. Apparently, pigeons are quite the rapid little breeders, doing it up to six times per year with two eggs in a clutch. One tenant contacted the landlord trying to get some pest control, but when I talked to her later she said the management-company basically said we could all get bent. So, no help there!
.
That means I'm going to have to battle these little creatures on my own - or at least start a research project figuring out what to do about them.
.
After all my beans were eaten last year, my brother-in-law told me he'd read that you can spray WD-40 on the railing to keep them away, since they don't like the smell. This is a fine suggestion, except that I use the railing to attach the beans to, and I don't think I want to be spraying a toxic substance like WD-40 all around my plants.
.
Wiki-How says that pigeons also don't like spices, so sprinkling some pepper, cayenne pepper or cinnamon where they like to roost will help to deter them. (Repeat applications after wet weather). This sounds much friendlier to my garden than the WD-40 idea.
.
I see further down the Wiki-How page, they also suggest using reflctors in tandem with other devices to try to scare them away - although it is a temporary solution, much like my fake owl; they work for a while, but after a time, the birds simply get used to the owl that never really moves or attacks them, and slowly on the pigeons show up on the balcony again. We knew this already last year, and what we should do is set up a second pole to set the scarecrow-owl on, so every few days we can change his position around.
.
I suspect that I will need to do more than sprinkle some spices around and put up a few reflectors though... so I'll keep researching the subject over the growing season, and chronicle my adventures in "The War of the Pigeons."
.

Thursday 26 February 2015

Welcome Back!

.


.
Well, hello there my 1.5 readers per month! Did ya miss me?
.
Since it's late February (and I live in one of the mildest climates in Canada), I figured that it was time to get on the balcony garden if I want to have it ready by the spring. Hey, the crocuses have been blooming here for several weeks, and I seen my first daffodils blooming only the other day. It's that time of year again.

The first thing I did was go through the compost pail. Composting has been a mixed success for me so far. As you can see in the buckets below, there is a lot of nice, loamy soil that has been created - but not all of it composted equally. On the right you can see the remains of last summer's potato plants, which obviously did not fully decompose, so I picked most of it out and threw it into the trash before spreading the rest around in the pots on the balcony.
.
.
After I was done with the compost, I planted some tomato seeds and pepper seeds in small yoghurt containers I've been saving up over the winter. In another week or two, I'll start some cucumber seeds in a few more containers. I hope these little things work out. Last year I used a few coffee cups, and that worked out okay. I'm going to try to grow everything from seed this year, to cut down on expenses.
.
.

I also planted some kale in two of the large pots, hoping that they will sprout and grow early in the spring, so that by May I can harvest it and use the pots for a different crop during the summer. I'm not sure if it's too early in the year... perhaps we might get another frost, and perhaps not, but at least kale is a cool weather plant so I'm keeping my fingers crossed.
.
This year I need to get the little garden producing better!
.
I'm fairly inexperienced starting a garden from seed, but here is an excellent article on the subject that I found over at the Game and Garden Blog which gave me a lot good pointers. Another good post on how to start plants from seed can be found at Sensible Survival.
.